Learning WebRTC
Explaining WebRTC to myself and others.
Published Mar 7, 2021
4297 words; 18 minutes to read.
WebRTC can be tricky to wrap your mind around – there’s a lot involved and it’s easy to get overwhelmed. Once you understand the basics though, it’s much easier to reason about the rest.
I’ve been working heavily with the standard over the past several weeks and wanted to document the knowledge I’ve gained while also providing some sample code, evaluating the technology’s pros and cons, and supplying resources for continued learning.
WebRTC stands for Web Real-Time Communication and, as you’d expect from the name, enables real-time communication for the web. Think video calls, web-based chat, etc.
The technology has grown significantly since its initial implementation in 2011 as an open-source project by Google. Today, it’s implemented as an open, standardized API that enables rich peer-to-peer communications, including the transmission of audio, video, and generic data between browsers, mobile devices, IoT devices, and more.
The most important thing WebRTC takes off your plate is the challenge of finding the best peer-to-peer path to exchange data in an efficient and low-latency manner.
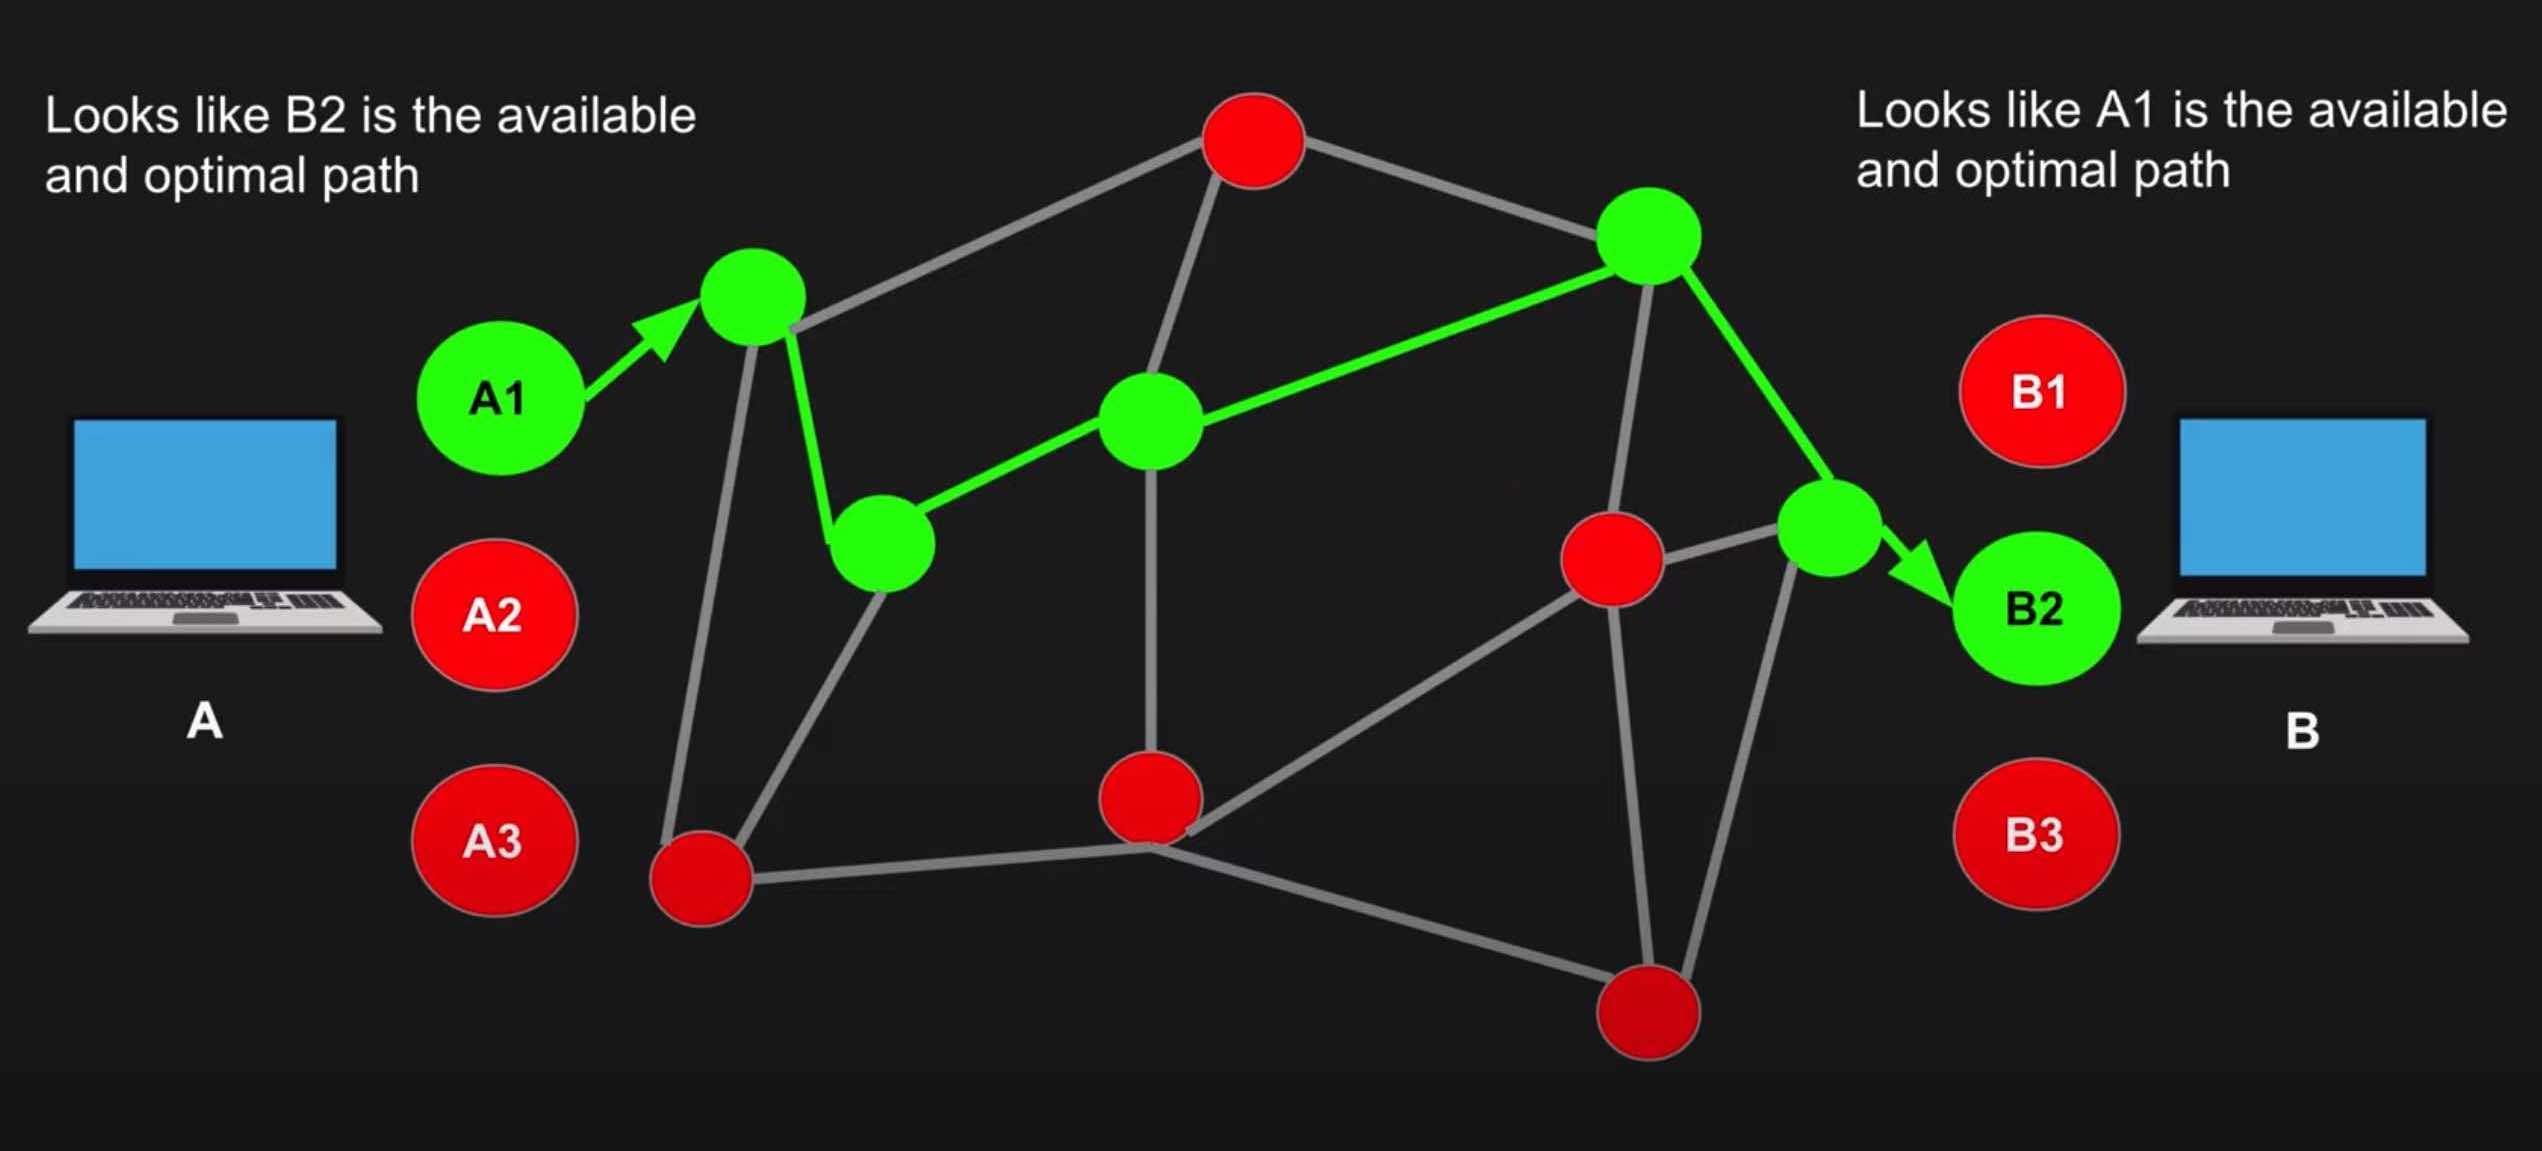
WebRTC Pathfinding - diagram from WebRTC Crash Course
A Typical WebRTC Lifecycle
- Client A wants to connect to Client B
- A first needs to determine all possible ways that the public can connect to it (A)
- B then also needs to determine how the public can connect to it (B)
- A and B signal this session information (SDP) (more on this later) to each other somehow. This can be via text message, with a QR code, via HTTP, via WebSockets, or something else. How you send this information doesn’t matter.
- A then connects to B via the most optimal path (determined by ICE) (more on this later as well)
- A & B also exchange their supported media types and security information
- An agreement is made, and the connection is opened
Necessary Concepts & Terminology
There are several terms you’ll need to be familiar with before we discuss WebRTC further. I’ll briefly introduce them below.
NAT: Network Address Translation
To understand WebRTC, you have to understand the fundamentals of NAT. I’ll try my best at a simple explanation of NAT and why it’s necessary here.
The problem: Devices don’t have their own public IP addresses.
The only way to connect to another device is via its public IP address. If our device doesn’t have its own public IP, how will we be able to communicate that information out for someone else to use?
The answer: NAT
NAT bridges this gap. NAT operates on the router and translates our devices’ private IPs into a public IP that others can reach us at.
When others try to reach you, they ultimately reach your router’s public IP and your router translates that back to your device’s private IP.
There are four different NAT types: Full Cone NAT (normal NAT), Address-Restricted NAT, Port-Restricted NAT, and Symmetric NAT. All of these work well with WebRTC except Symmetric NAT. More info on the four NAT types here.
Edit: According to the Internet Engineering Task Force, the “Cone” and “Symmetric” NAT terminology has done a poor job explaining NAT behavior. While you may still see these terms when reading about NAT, it is recommended to use the following terminology instead: Endpoint-Independent mapping and filtering, Address-Dependent mapping and filtering, and Address and Port-Dependent mapping and filtering.
Address and Port-Dependent mapping and filtering is the equivalent of Symmetric NAT, which is the only type that does not work with WebRTC. You can read more about the new NAT terminology here.
In the context of WebRTC, our devices pass through our routers to a STUN server. The STUN server sends us back a public IP address we can use to connect peer-to-peer with another client.
STUN: Session Traversal Utilities for NAT
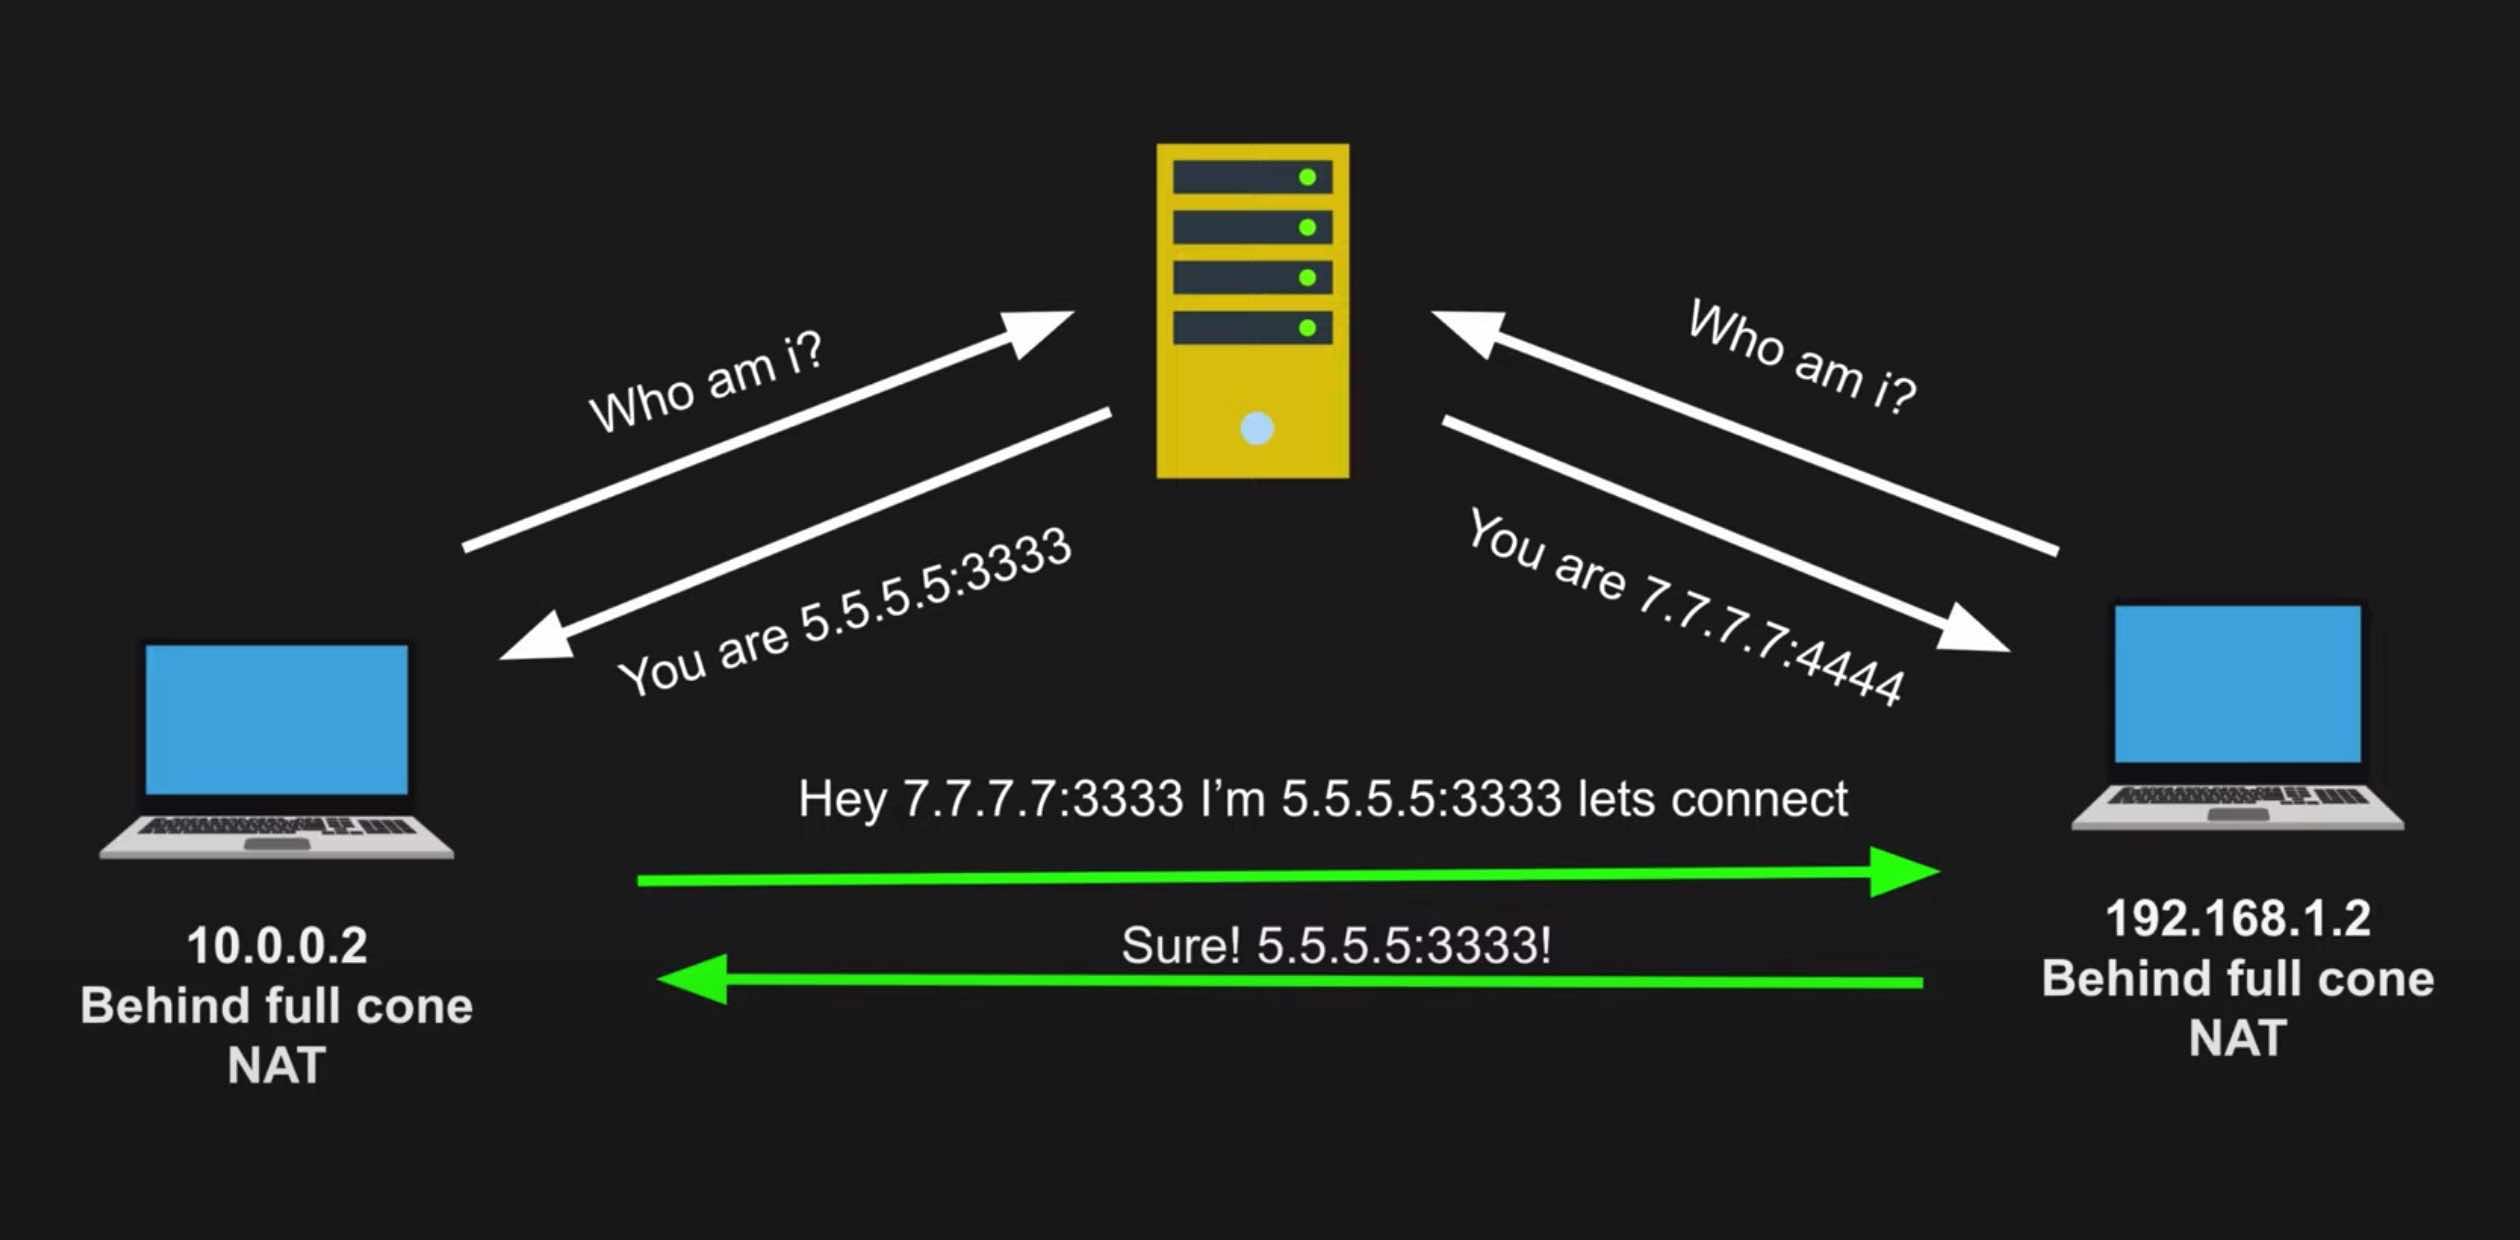
A STUN Server Example - diagram from WebRTC Crash Course
A STUN server’s main job is to tell a client what its public IP address/port is through NAT.
Talking to a STUN server is table stakes for any WebRTC application. We first need to find our public presence so we can communicate that information to someone else. Once someone else has that information, we can try to open a connection with them.
STUN servers are cheap to maintain, and many are publicly available for free usage.
TURN: Traversal Using Relays around NAT
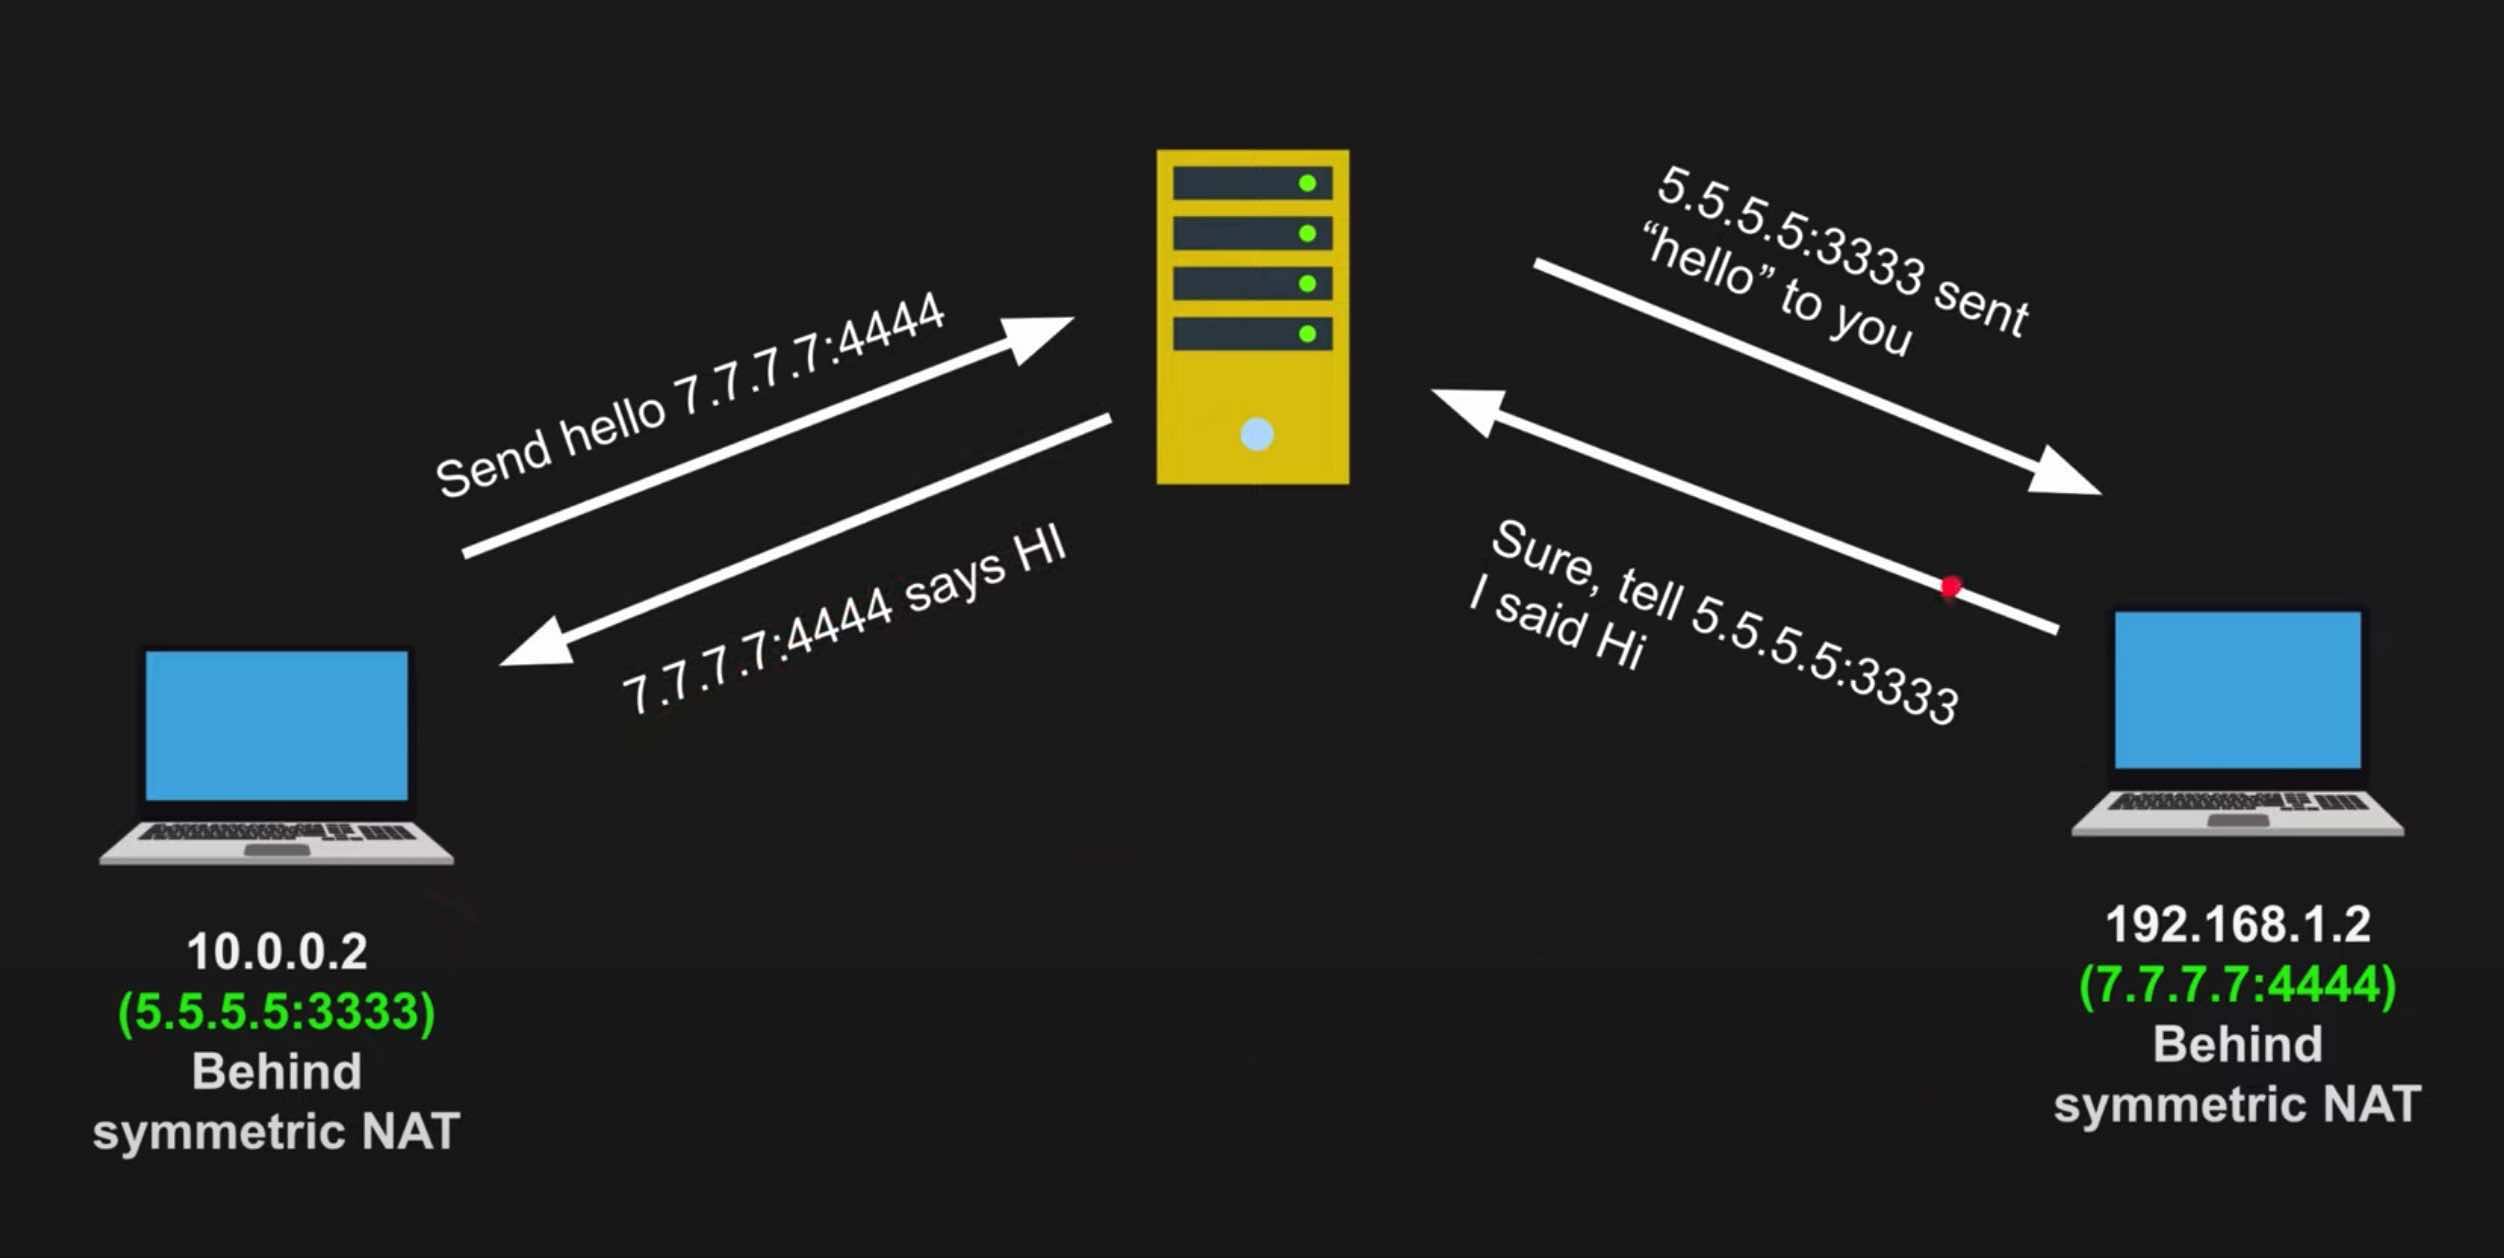
A TURN Server Example - diagram from WebRTC Crash Course
As I mentioned previously, WebRTC does not work well with Symmetric NAT. This is caused by Symmetric NAT blocking communications with the STUN server.
If a router is using Symmetric NAT, STUN won’t work, and we’ll have to fall back to a TURN server. This gets rid of the peer-to-peer benefit of WebRTC and requires all communication to pass through this single TURN server instead, which creates a bottleneck and could buckle under heavy usage.
If a TURN server is required, I’ve heard people argue for just using a standard web server with a reverse proxy instead. Theoretically this would give you similar functionality while allowing you to have more control over the server. I haven’t formed my own opinion on this topic yet.
ICE: Interactive Connectivity Establishment
So we’ve discussed private IP addresses, public IP addresses, STUN servers, TURN servers, and more. How do we know which options are the best to connect with?
This is the primary job of ICE. It finds the optimal path from one peer to another by conducting connectivity checks.
ICE collects all available ICE candidates (information for each available path) and sends them to the remote peer via SDP. ICE will then collect all available candidates on the remote peer as well.
With both peers’ session information now understood, ICE can determine the best path for a connection between the two clients.
This process can take some time, sometimes in the 10s of seconds. To get off the ground a little quicker, you can use a relatively new WebRTC feature called Trickle ICE. Trickle ICE takes the ICE process and runs it in parallel, so you won’t need to wait for every candidate to be found before sending the information via SDP. This can dramatically improve the time it takes to make the initial connection with the remote peer.
SDP: Session Description Protocol
"sdp":"v=0\r\n\
o=- 20518 0 IN IP4 203.0.113.1\r\n\
s= \r\n\
t=0 0\r\n\
c=IN IP4 203.0.113.1\r\n\
a=ice-ufrag:F7gI\r\n\
a=ice-pwd:x9cml/YzichV2+XlhiMu8g\r\n\
a=fingerprint:sha-1 42:89:c5:c6:55:9d:6e:c8:e8:83:55:2a:39:f9:b6:eb:e9:a3:a9:e7\r\n\
m=audio 54400 RTP/SAVPF 0 96\r\n\
a=rtpmap:0 PCMU/8000\r\n\
a=rtpmap:96 opus/48000\r\n\
a=ptime:20\r\n\
a=sendrecv\r\n\
a=candidate:0 1 UDP 2113667327 203.0.113.1 54400 typ host\r\n\
a=candidate:1 2 UDP 2113667326 203.0.113.1 54401 typ host\r\n\
m=video 55400 RTP/SAVPF 97 98\r\n\
a=rtpmap:97 H264/90000\r\n\
a=fmtp:97 profile-level-id=4d0028;packetization-mode=1\r\n\
a=rtpmap:98 VP8/90000\r\n\
a=sendrecv\r\n\
a=candidate:0 1 UDP 2113667327 203.0.113.1 55400 typ host\r\n\
a=candidate:1 2 UDP 2113667326 203.0.113.1 55401 typ host\r\n\
"
An SDP Example - basically a giant string of session information
SDP is arguably the most important concept in WebRTC. SDP is the information that ICE sends back and forth to try and establish the best possible connection.
Despite its name, SDP is less of a protocol and more of a format. It describes all ICE candidates, networking options, media options (audio/video), security options, etc., and combines it all into one massive string.
Once another client has this information, a connection between the two clients can be attempted.
For another person to connect with us though, we need some way to communicate our SDP information out to them. This is called signaling.
Once you have your SDP string, you’ll need to signal it out yourself. WebRTC does not care how this is done, but it also doesn’t provide a built-in way to do this. You can send out your SDP information through a QR code, a messaging app like WhatsApp or iMessage, via WebSockets, HTTP, or anything else. We just need to get that large SDP string to the other party.
DTLS, SRTP, & SCTP – Securing and Customizing WebRTC Data Flow
DTLS: Datagram Transport Layer Security
SRTP: Secure Real-time Transport Protocol
SCTP: Stream Control Transmission Protocol
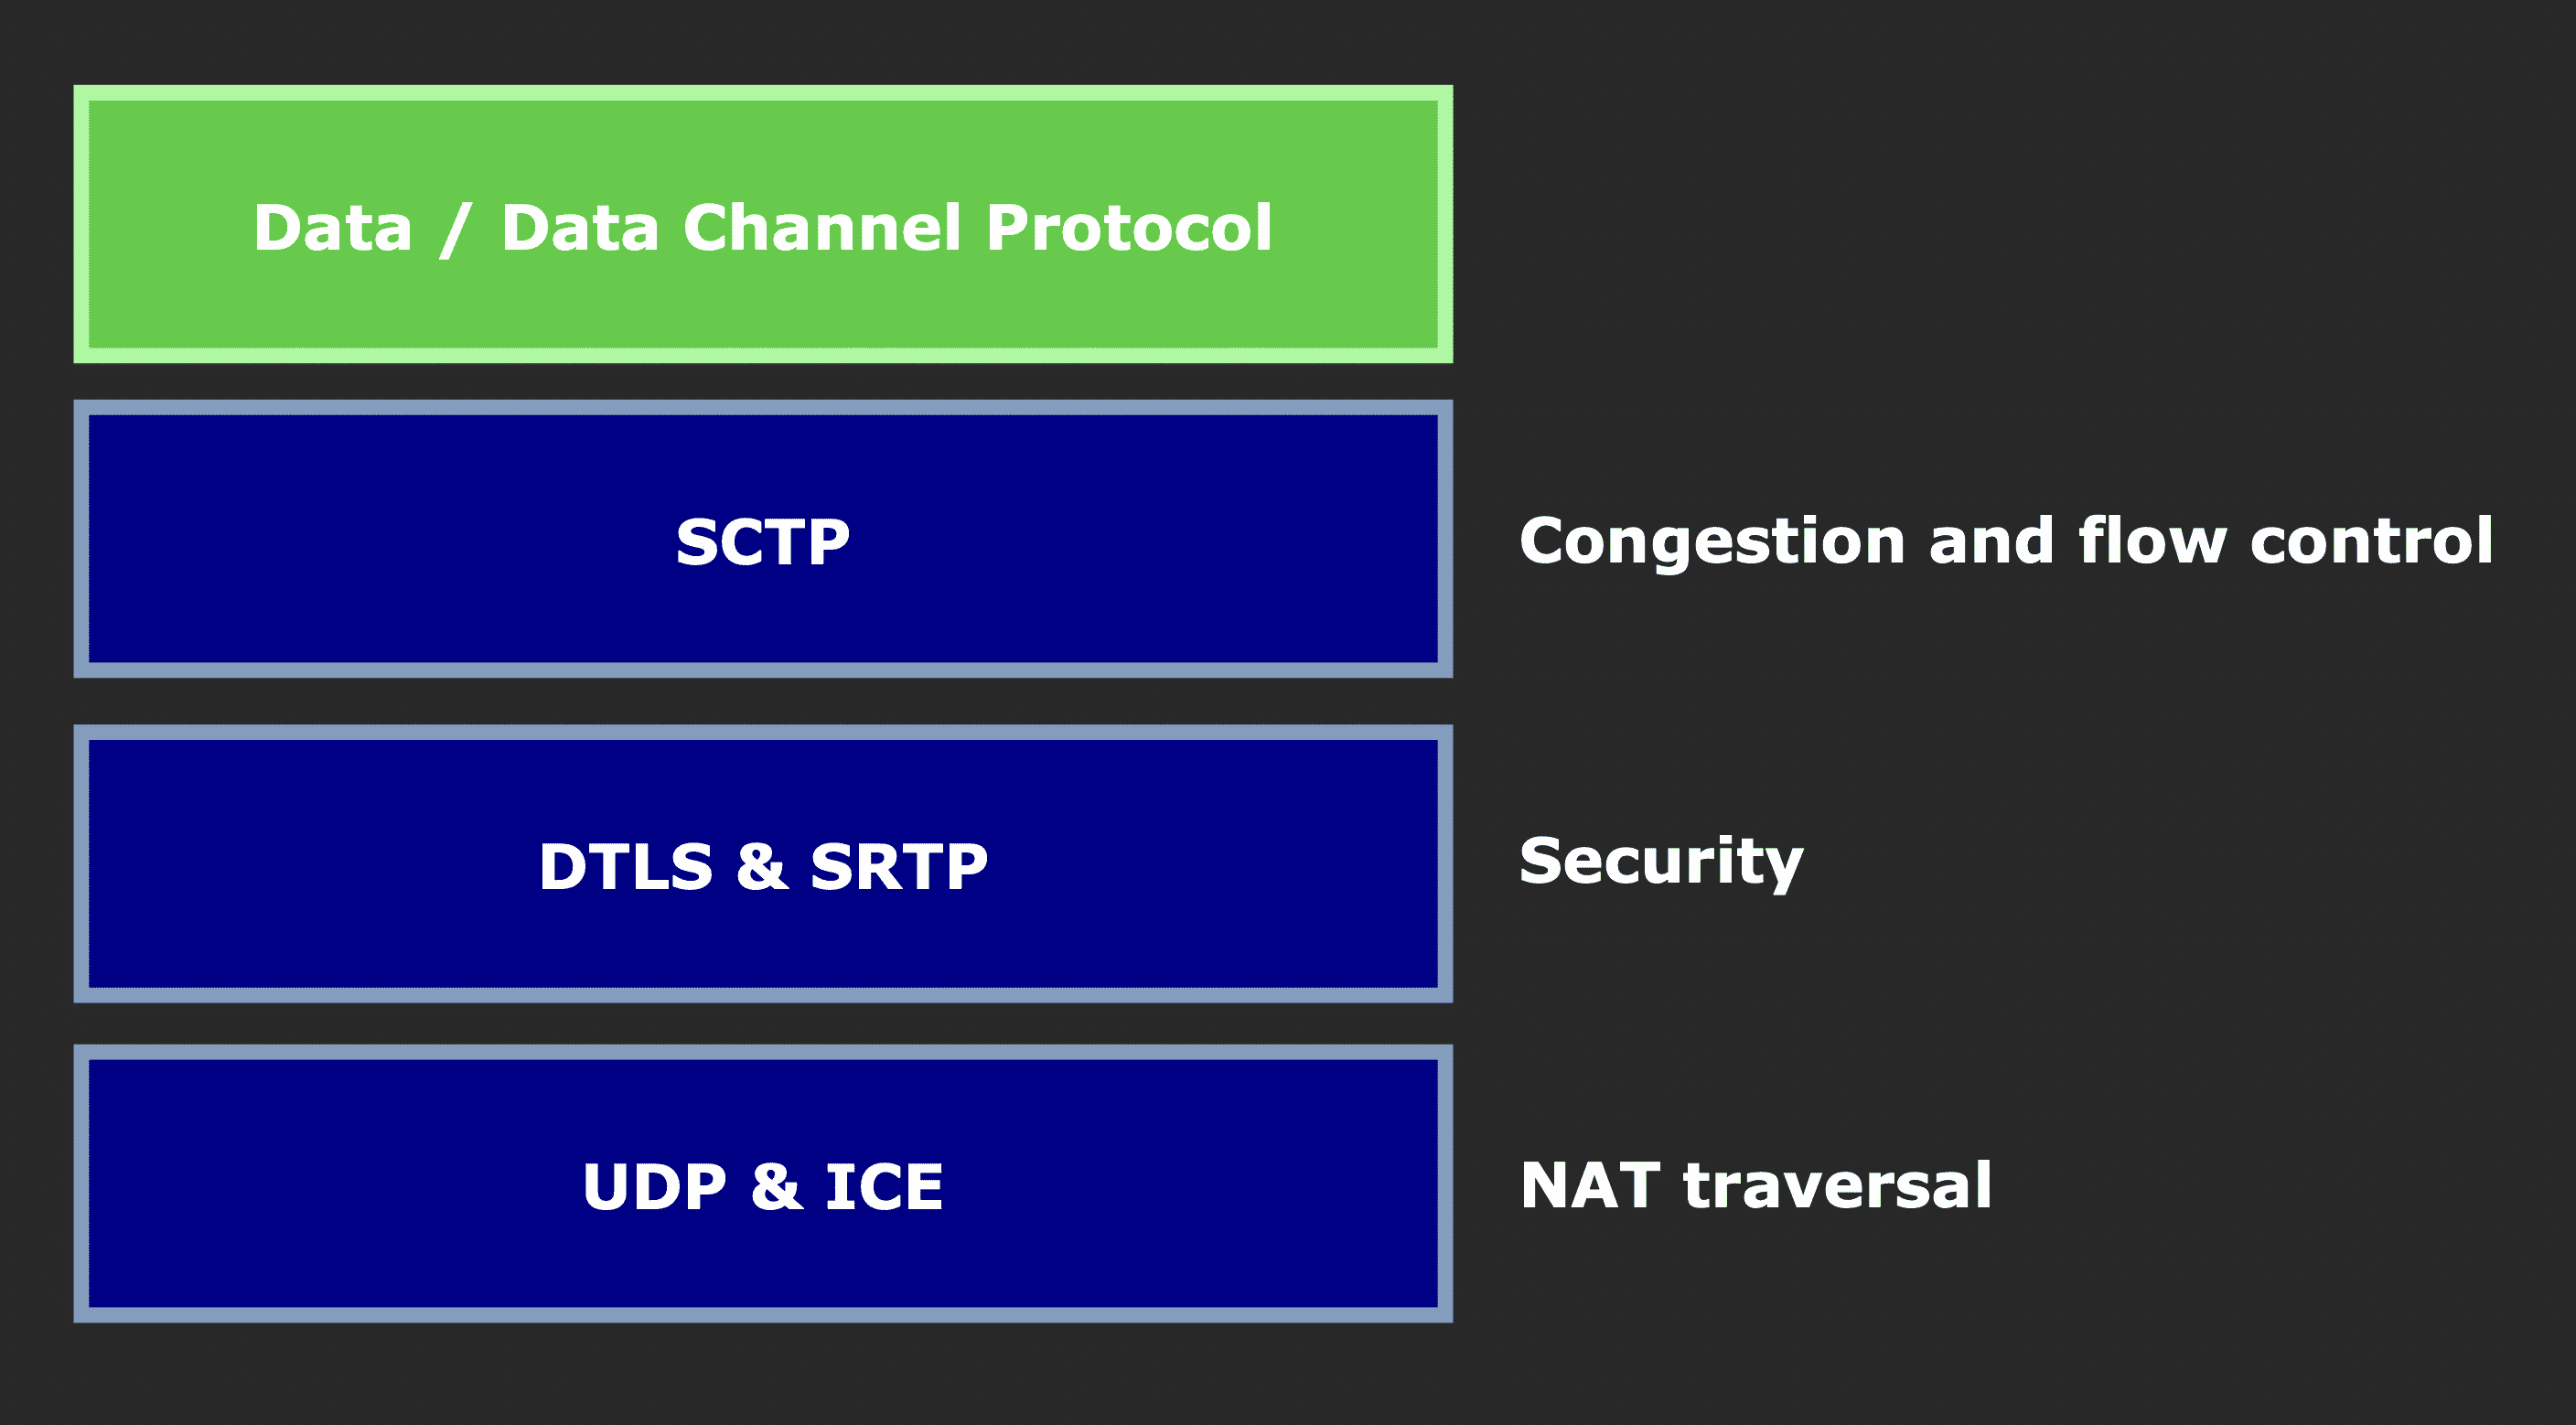
WebRTC Data Flow - diagram concept from BlogGeek.me
Note that WebRTC did not introduce these protocols. They were around long before WebRTC was established in 2011. DTLS was invented in 2006, SRTP in 2004, SCTP in 2000.
The purpose of DTLS and SRTP is to secure the connection previously established by ICE.
First, WebRTC does a DTLS handshake over the connection that ICE established. Once that handshake has been completed, we have a secure connection, and this new DTLS connection is used for messages over our data channel.
We then use SRTP for secure audio and video transmission. The SRTP session is encrypted by extracting the keys from the negotiated DTLS session.
Once both of these steps have been completed, we have a bi-directional and secure communication channel.
The final term to understand here is SCTP. SCTP provides different options for delivering messages. You can choose to have unreliable, out-of-order delivery so you can get the latency needed for real-time systems; or you can opt for reliable, in-sequence transmission of messages with congestion control.
Revisiting the WebRTC Lifecycle
Now that we understand the fundamental WebRTC concepts, let’s revisit a standard WebRTC communication lifecycle with some more detail.
Some additional information first: Every client maintains two SDP descriptions, a local SDP description and the SDP description of the remote client it’s trying to connect to.
- Client A wants to connect to Client B
- A creates an offer. The offer is just the SDP string that consists of all ICE candidates, security options, audio/video options, etc
- A then sets its local SDP description to the offer it just created.
- A signals that offer to B via SDP. Again, it doesn’t matter how this signaling happens (iMessage, HTTP request, etc)
- B receives A’s offer, and sets A’s offer as its remote SDP description
- B creates an answer to send back to A, and sets that answer as its own local SDP description
- B signals its answer to A via SDP
- A receives B’s answer, and sets B’s answer as A’s remote SDP description
- With all SDP information now understood by both parties, an agreement can be made. The connection is created and data can flow between the two clients
A Vanilla Implementation
Let’s walk through how to create a basic WebRTC connection between two peers using just the vanilla WebRTC API. We won’t use any libraries or anything extra on top of it – just the basics so you really understand what’s happening here. You could run this code directly in two browser windows via the browser’s dev tools and it would work.
Note that we will not need to connect to any STUN or TURN servers in this example, as both browsers will be on the same local area network. STUN and TURN are only required when connecting to a remote peer on a different network. If we did need to connect to a STUN/TURN server, we’d pass that information into the new RTCPeerConnection we create in step one.
Browser One
- Create the local peer connection.
const localConnection = new RTCPeerConnection()
- Create a data channel from that connection.
const dataChannel = localConnection.createDataChannel("channel")
- Set up listeners on this channel for when a message is received (onmessage) and when a connection is opened (onopen).
dataChannel.onmessage = e => console.log("Just got a message " + e.data)
dataChannel.onopen = e => console.log("Connection opened!")
- Set up a listener on the local connection for new ICE candidates. Print the SDP string every time we get a new ICE candidate. This will provide examples of what SDP strings look like.
localConnection.onicecandidate = e => console.log("New ICE candidate! Reprinting SDP " + JSON.stringify(localConnection.localDescription))
- Create the offer locally, and set that offer as our local SDP description.
localConnection.createOffer()
	.then(offer => localConnection.setLocalDescription(offer))
	.then(a => console.log("Set local SDP description successfully"))
Browser Two
Now open a new browser window, and we’ll work on connecting the two browsers.
- After running the previous commands in browser one, you should have an SDP offer string printed out in your browser’s dev tools. Copy and paste that from browser one, and set it to a new variable in browser two. It should look something like this:
const offer = {"type":"offer","sdp":"v=0\r\no=- 6161885883039613335 2 IN IP4 127.0.0.1\r\ns=-\r\nt=0 0\r\na=group:BUNDLE 0\r\na=extmap-allow-mixed\r\na=msid-semantic: WMS\r\nm=application 9 UDP/DTLS/SCTP webrtc-datachannel\r\nc=IN IP4 0.0.0.0\r\na=candidate:613963537 1 udp 2122262783 8feb3e9a-4ba2-48b6-a5b9-b7e6164dad0d.local 50380 typ host generation 0 network-id 2 network-cost 50\r\na=ice-ufrag:m9IL\r\na=ice-pwd:HSi4w0HG5HCDGlhkTaJVACHM\r\na=ice-options:trickle\r\na=fingerprint:sha-256 B5:BF:A6:FA:45:FE:83:B7:AF:D2:03:5F:FC:EF:06:ED:2E:C2:51:A3:53:7E:7E:7A:B0:6D:AE:08:9C:3A:A4:D7\r\na=setup:actpass\r\na=mid:0\r\na=sctp-port:5000\r\na=max-message-size:262144\r\n"}
- Create the remote peer connection.
const remoteConnection = new RTCPeerConnection()
- Print the SDP string every time we get a new ICE candidate on the remote side this time.
remoteConnection.onicecandidate = e => console.log("New ICE candidate! Reprinting SDP " + JSON.stringify(remoteConnection.localDescription))
- Set up a listener on the remote connection that will receive the data channel from the other connection.
remoteConnection.ondatachannel = e => {
	remoteConnection.dataChannel = e.channel // e.channel is the data channel we received from the other party
	remoteConnection.dataChannel.onmessage = e => console.log("New message from client! " + e.data)
	remoteConnection.dataChannel.onopen = e => console.log("Connection successfully opened!")
}
- Set our remote and local SDP descriptions based on the offer we received (remote SDP description) and the answer we create (local SDP description).
// set remote description for the offer we received
remoteConnection.setRemoteDescription(offer)
	.then(a => console.log("Offer set!"))

// set local description with our answer
remoteConnection.createAnswer()
	.then(answer => remoteConnection.setLocalDescription(answer))
	.then(a => console.log("Answer created"))
Back to Browser One
- Set the answer SDP we just generated in the previous step to an answer variable.
const answer = {"type":"answer","sdp":"v=0\r\no=- 1817317559757912498 2 IN IP4 127.0.0.1\r\ns=-\r\nt=0 0\r\na=group:BUNDLE 0\r\na=extmap-allow-mixed\r\na=msid-semantic: WMS\r\nm=application 9 UDP/DTLS/SCTP webrtc-datachannel\r\nc=IN IP4 0.0.0.0\r\na=candidate:613963537 1 udp 2122262783 264b84bf-cd92-41f3-9b5c-6d08060977f8.local 58006 typ host generation 0 network-id 2 network-cost 50\r\na=ice-ufrag:O629\r\na=ice-pwd:8TOlrnjf31jsOOIHZZGnT1Xh\r\na=ice-options:trickle\r\na=fingerprint:sha-256 DC:CE:94:53:BC:E1:BF:1F:67:44:08:5F:8E:A5:B7:AD:01:D3:84:C8:FC:D5:BA:D7:76:28:E3:3F:FC:15:3E:9B\r\na=setup:active\r\na=mid:0\r\na=sctp-port:5000\r\na=max-message-size:262144\r\n"}
- We’re coming full circle now. In the first section (Browser One), we set the local connection’s local description. In the second section (Browser Two), we set the remote connection’s local & remote descriptions. And now, we close the loop by setting the local connection’s remote description to the answer we just set in the previous step. This opens the connection between the two peers.
localConnection.setRemoteDescription(answer)
- The connection is now open, and we can send data back and forth between the two browsers with the send() function.
Browser One (the local connection)
dataChannel.send("Hello Peer B, what's up?")
Browser Two (the remote connection)
remoteConnection.dataChannel.send("Not much Peer A, what about you?")
- You should see each of those messages in the other browser’s dev tools now. 👍
WebRTC Pros and Cons
Pros:
- Having a peer-to-peer connection is fantastic. It allows for low latency and high-bandwidth content to be shared seamlessly
- WebRTC provides a standardized way for developers to implement this functionality with an API that we don’t have to build ourselves
- It’s a popular open-source technology supported by Google, Mozilla, Opera, and others. You can browse the source code here
Cons:
- Maintaining STUN and TURN servers * STUN isn’t too bad since there are free STUN servers publicly available for you to use. * TURN is expensive and more difficult, and no one offers them for free usage like STUN servers * Kind of a Pro, but you can create your own STUN and TURN servers with the COTURN open-source project
- Peer-to-Peer can fall apart in cases of many participants * If you have 100 people in one environment, maintaining peer-to-peer connections between all 100 people isn’t viable. This would be 99x100 individual connections * A centralized server makes more sense here. Everyone connects to the centralized server, and you maintain the connection and traffic rules on that server * More latency in this scenario, but much more viable * Large online games don’t use WebRTC, for example. They use a centralized server people connect to
Powering Up with Amazon Kinesis Video Streams
As mentioned, one of the cons of WebRTC is the need to maintain and manage various STUN and TURN servers.
Amazon Kinesis Video Streams with WebRTC offers a potential solution to this problem, as well as handling the signaling implementation for you.
AWS offers SDKs to work with this service from the web, iOS, Android, and embedded devices.
In AWS’s words, Amazon Kinesis Video Streams (KVS) “provides a standards-compliant WebRTC implementation as a fully managed capability. You can use Amazon Kinesis Video Streams with WebRTC to securely live stream media or perform two-way audio or video interaction between any camera IoT device and WebRTC-compliant mobile or web players. As a fully managed capability, you don’t have to build, operate, or scale any WebRTC-related cloud infrastructure, such as signaling or media relay servers to securely stream media across applications and devices.”
Using this service abstracts away the need to manage your own STUN and TURN servers while optimizing for even lower latency and higher bandwidth streaming.
There’s a fantastic walkthrough of how to get up and running with this service here. Familiarity with AWS isn’t necessarily required to follow that blog post but is certainly helpful.
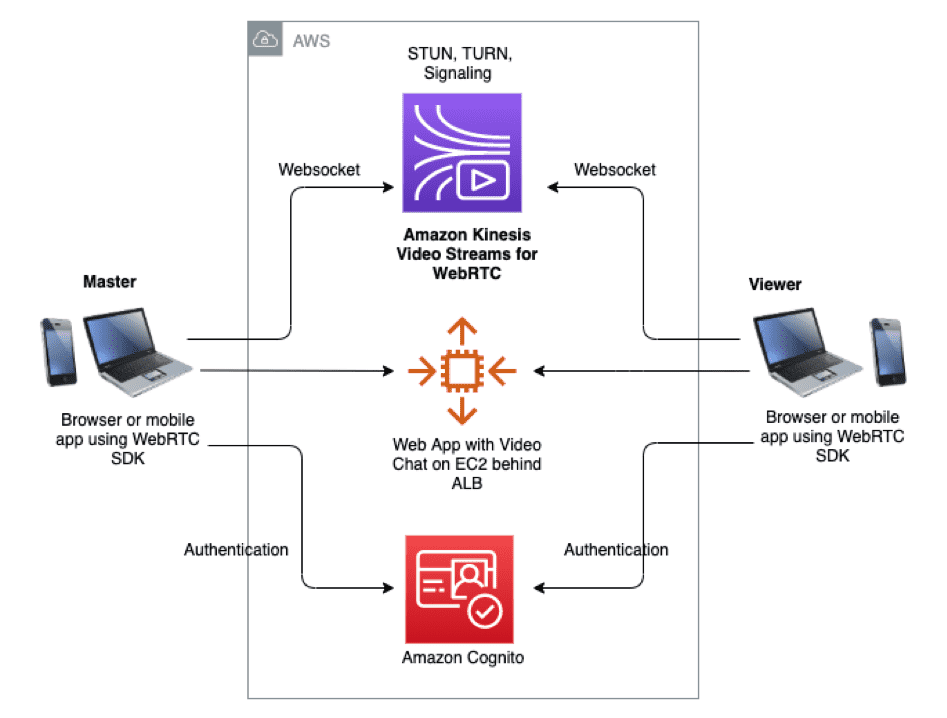
AWS Kinesis Video Streams with WebRTC Architecture Diagram
I was able to build a very performant peer-to-peer video streaming application by building on top of the aforementioned walkthrough. I recommend giving it a try and seeing how it goes for you. There’s also some fantastic sample code on GitHub.
Resources I Used While Learning
- Getting Started with WebRTC on WebRTC.org
- WebRTC API on the Mozilla Developer Network
- WebRTC For The Curious
- WebRTC Crash Course on YouTube
- This was particularly helpful. I highly recommend you take the time to watch the full thing
- Many of the concepts in this post were inspired directly by this video
- Introduction to WebRTC on YouTube
- What is Kinesis Video Streams with WebRTC from AWS
- Kinesis Video Streams with WebRTC: How it Works from AWS
- Enabling Video Chats Using Amazon Kinesis Video Streams with WebRTC from AWS
- Amazon Kinesis Video Streams implementation on GitHub
A Final Note
There are a lot of YouTube videos that claim to teach you WebRTC by “building a Zoom clone” or something similar. I worked through a couple of these and found them to be less than valuable. Most layer on a bunch of third-party libraries like socket.io, simple-peer, peer.js, and others to handle the dirty work.
In my opinion, it’s far better to fully understand the fundamentals before adding on these libraries.
Thank you for reading!