It’s Swift on Server, minus the server. Deployed on AWS via Swift Cloud.
I’ve long been interested in running Swift on the back end, but it wasn’t until a combination of a fun project idea and a spark from Swift Cloud that I was inspired to dig in and try it out. But why do it this way? How does it work? And how well does it run in terms of cost and performance? We’ll break all of that down.
TL;DR
I built an event-driven serverless back end entirely in Swift that remotely flashes the Philips Hue bulbs in my house whenever my favorite sports teams score or win. It runs on AWS services including Lambda, DynamoDB, SQS, and EventBridge, and costs less than $0.20/month.
You can view the full source code for this project on GitHub.
Background
They say the only constant in life is change, and that has certainly been the case for my career in software development. I got started in front-end web development, grew to pick up traditional back-end development, fell in love with serverless back-end development, and then turned my favorite pastime into my full-time job building native Swift apps for iOS.
For the last several years, I’ve locked in on the two areas I’m most passionate about and enjoy the most: serverless back-end development and native iOS development with Swift.
I’ve written independently about both serverless and Swift before, but this is the first time I’ve gotten to combine the two. It’s been a ton of fun working on the project and writing this post.
Why Serverless?
The first thing that comes to mind when you think Swift on Server is probably Vapor, or maybe Hummingbird. I am interested in both, and have used Vapor in the past, but I leaned on serverless for this project for reasons that I could talk about for days.
To keep it brief, I simply enjoy building serverless systems. Once you understand the primitives, serverless offers the best combination of speed, cost, fun, and scale that I know of. It’s not a cure-all, but it’s great for projects like this.
Additionally:
- It’s in the name - you never have to deal with servers
- It’s cheap, especially for small projects like this one. More on cost later
- It automatically scales up and down. Ideally to zero
- It’s simple to configure basic services
- You can write the services in any language
- Infrastructure as Code platforms make hooking up the primitives seamless
Why Swift?
Honestly, the main reason is because I thought it would be fun. And it was! I had a blast building this.
There are other, more pragmatic, reasons as well:
- It’s the language I know best - I use it to write all of my iOS apps
- It promises excellent performance and a low memory footprint
- It does not incorporate a Just-In-Time (JIT) compiler, which conserves CPU and memory resources and results in quicker Lambda startup times
- It uses Automatic Reference Counting, which allows for deterministic performance
- It’s strongly typed, null-safe, and a joy to write
- It has a robust and modern package ecosystem
The Project
As mentioned above, it’s a serverless system written in Swift that controls Philips Hue bulbs in my house whenever my favorite sports teams (Tulsa football & basketball, Eagles football) score or win. It runs on AWS Lambda, DynamoDB, SQS, and EventBridge.
Tools
I used Xcode to build it, but any editor that supports the SourceKit-LSP will work - including VS Code, Neovim, Emacs, Nova, and others.
The deployment engine that makes this project go is Swift Cloud. It’s the infrastructure as code tool I use to deploy my Swift package to AWS with the configuration I define. Specifically, Swift Cloud vends Swift components like AWS.Function() that get compiled into Pulumi YAML files. The Pulumi CLI deploys that configuration to the cloud when you run Swift Cloud’s swift run Infra deploy command. Notably, you don’t need to know anything about Pulumi to use Swift Cloud. It’s just used internally.
I’ve used other IaC tools like the Serverless Framework and SST. They are great, but they either don’t support custom runtimes like the swift-aws-lambda-runtime at all, or require the use of Lambda Layers to use them. Swift Cloud supports it out of the box with no hassle. It’s been great to work with.
Infrastructure
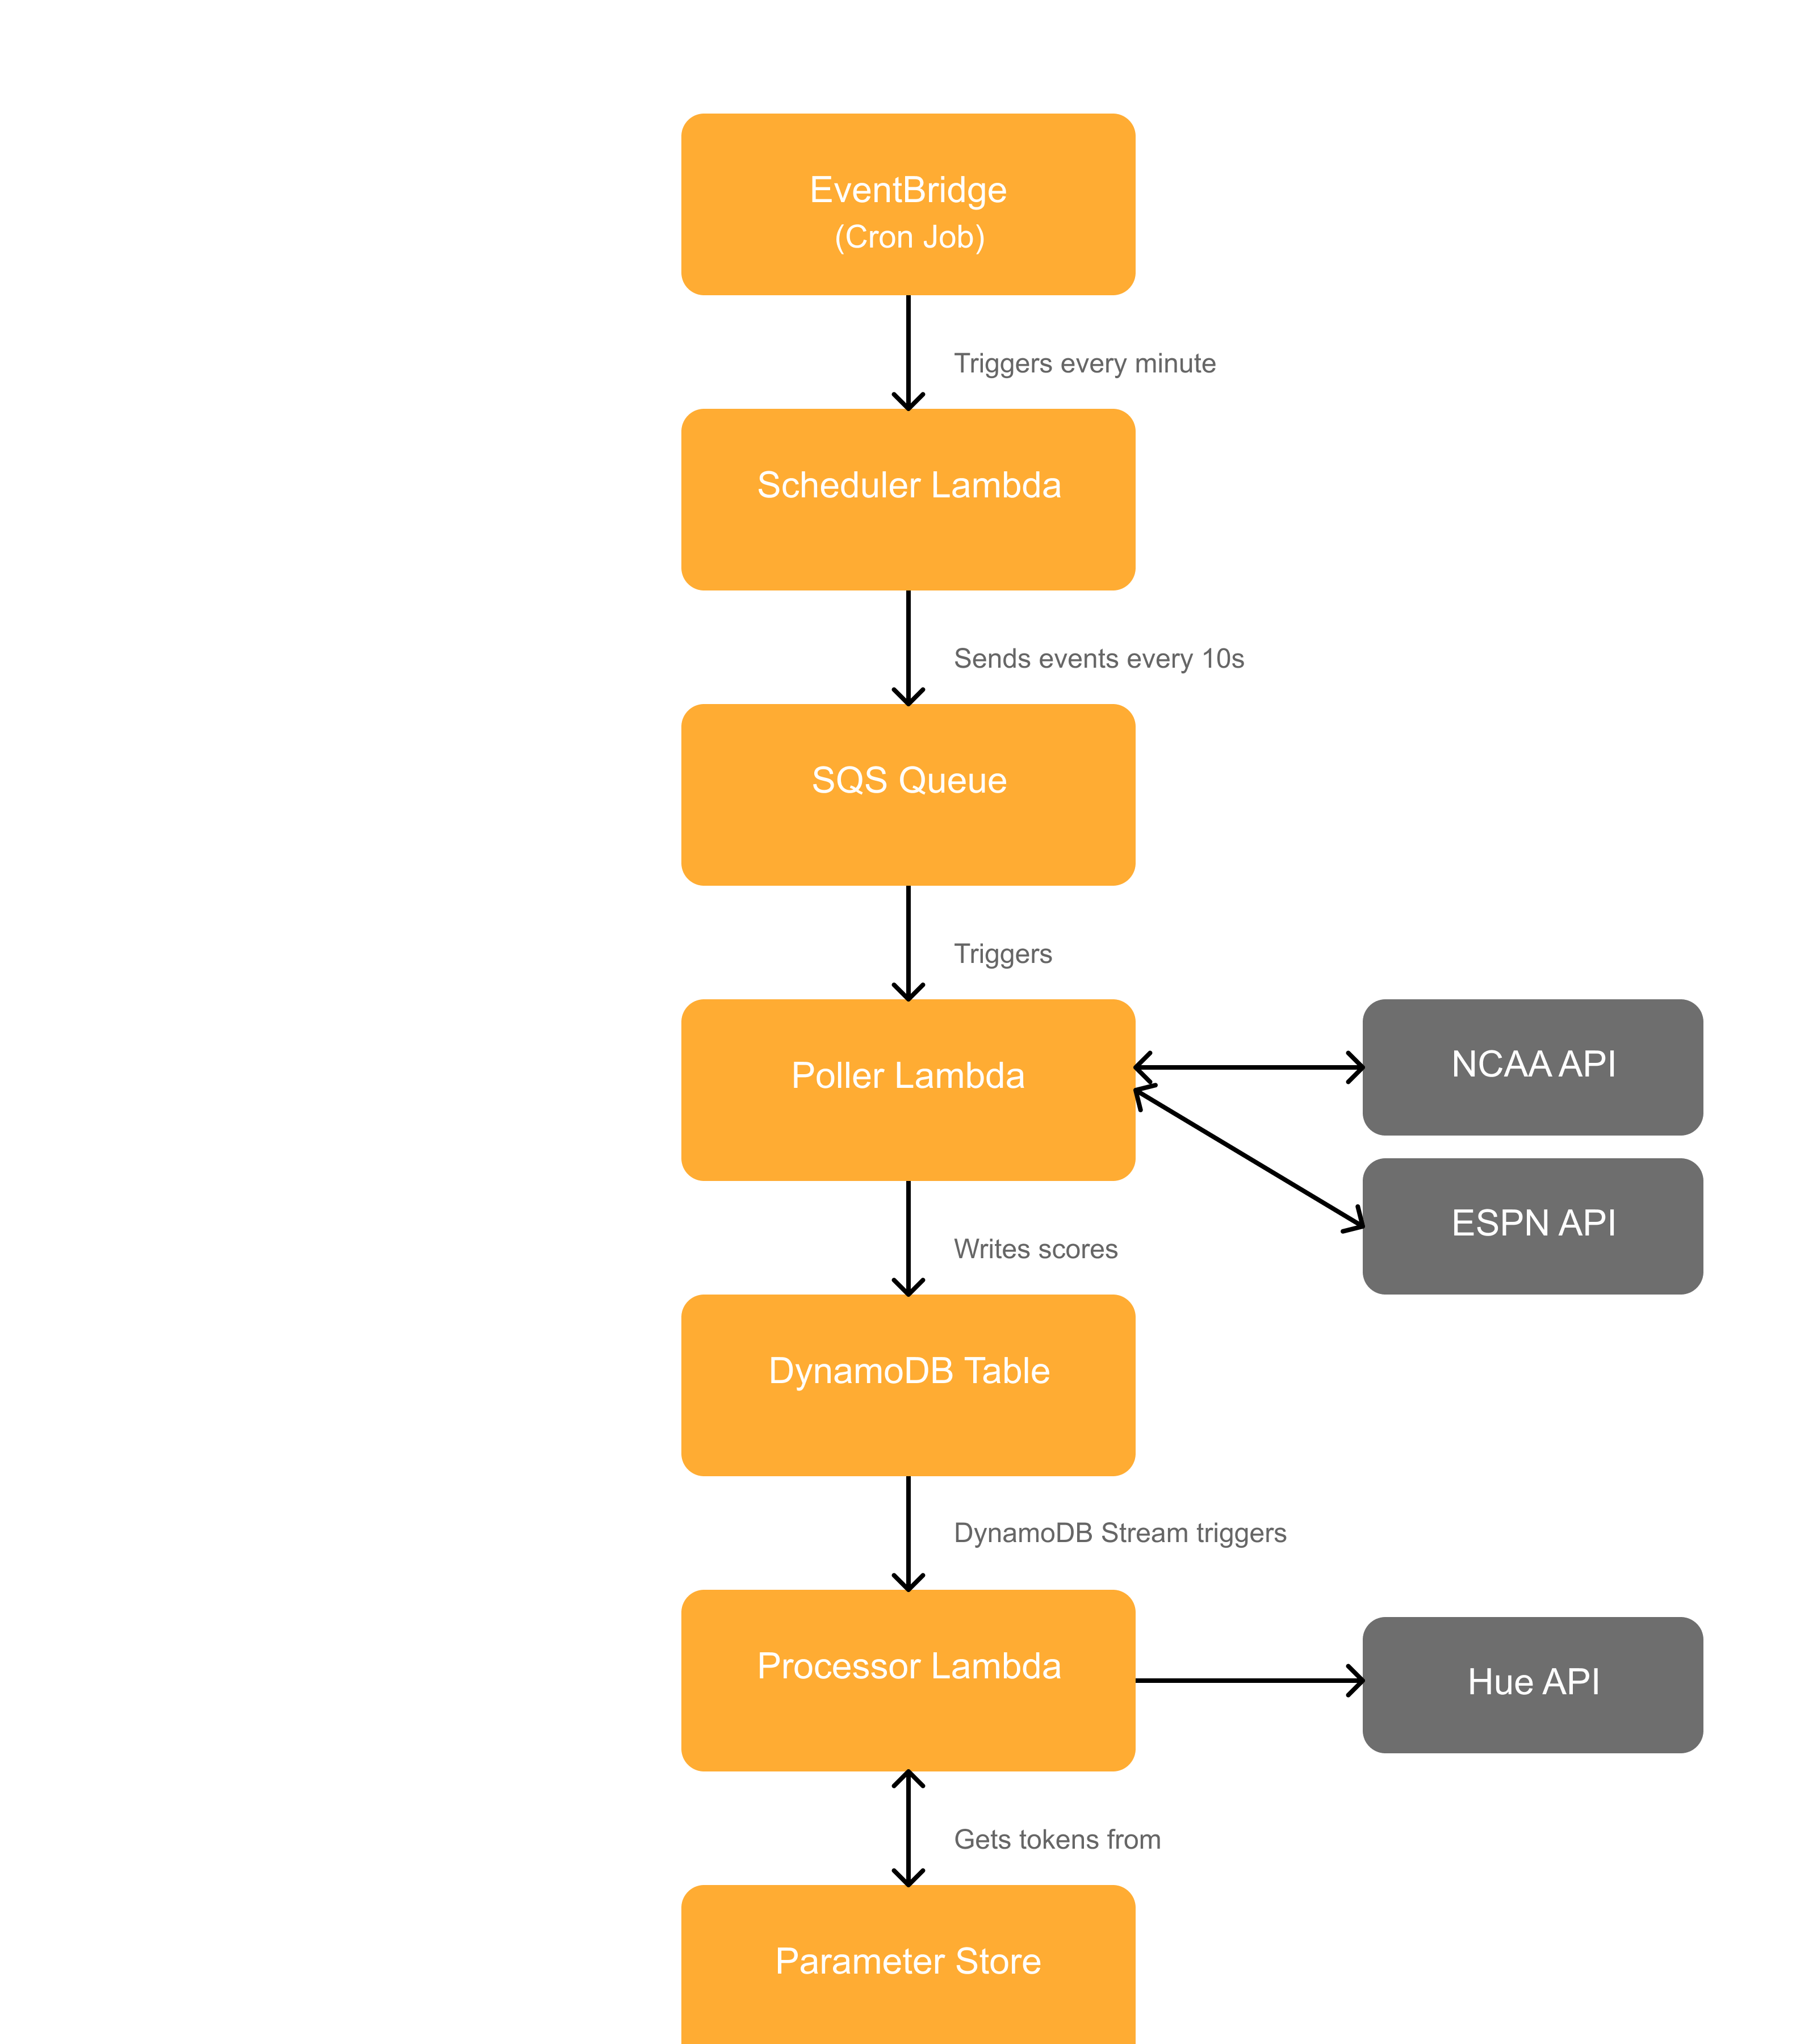
The project currently consists of six primary pieces of infrastructure, all of which are defined within Sources/Infra/Project.swift:
- A cron job managed by EventBridge that triggers my scheduler function
- A scheduler Lambda function that fires off SQS events every 10 seconds
- An SQS queue to hold those events
- A poller Lambda function triggered by SQS that polls the ncaa-api for Tulsa football, men’s basketball, and women’s basketball scores, and the public-espn-api for Eagles scores. It writes those results to DynamoDB
- A DynamoDB table that keeps track of the games found in the previous step
- A processor Lambda function triggered by DynamoDB Streams that checks the scores for those teams I care about, and if they scored (football only) or won, make my Philips Hue lights go nuts in that team’s colors
The basic data flow looks like this:
It also consists of two other pieces of infrastructure used to refresh my Hue API tokens every three days:
- A cron job managed by EventBridge that triggers my token refresher function
- A token refresher Lambda function that refreshes my Hue API tokens
Project Configuration
I won’t go through the code in too much depth. You can look through all of it yourself on GitHub. But I will cover the key elements.
Package.swift
First, you have to create a new Swift package. Since I used Xcode as my editor, I did this from Xcode by navigating to File -> New -> Package, chose macOS as the platform, and chose Executable as the package type. Alternatively, you can do it via the CLI by running swift package init --name MySwiftPackage --type executable.
Once your package is created, you need at minimum a single .executableTarget which will point to the file containing your infrastructure definitions, plus the Swift Cloud dependency.
At its most basic, that looks like this:
import PackageDescription

let package = Package(
	name: "MySwiftPackage",
	dependencies: [
		.package(url: "https://github.com/swift-cloud/swift-cloud.git", branch: "main"),
	],
	targets: [
		.executableTarget(
			name: "Infra",
			dependencies: [
				.product(name: "Cloud", package: "swift-cloud")
			]
		)
	]
)
I called my target Infra, as that was the default name Swift Cloud suggested, but you can call it whatever you’d like.
Once you have that set up, you need to create a folder called Sources, a folder inside Sources named whatever you named your .executableTarget above, and then a Swift file named whatever you want - I used Project.swift.
Project.swift
Project.swift is where you define your infrastructure. I housed all six of the pieces of infrastructure I needed within this one file, but nothing is stopping you from breaking this up into multiple files and configuring it however you’d like.
This file is where you configure the resource primitives you want to use, like functions, databases, queues, and more.
Swift Cloud provides these components for you across a variety of cloud providers. AWS is my cloud of choice, though they also offer providers for Cloudflare, Digital Ocean, Fastly, and Vercel.
I mentioned I use EventBridge for cron jobs, Lambda for processing, SQS as a queue system, and DynamoDB for data storage. In Swift Cloud, configuring those is as simple as this:
let pollerCron = AWS.Cron(
	"sports-api-cron-job",
	schedule: .rate(.minutes(1))
)

let sportsApiScheduler = AWS.Function(
	"sports-api-scheduler",
	targetName: "Scheduler"
)

let sportsApiPollerQueue = AWS.Queue("sports-api-poller-queue")

let scoresTable = AWS.DynamoDB(
	"Scores",
	primaryIndex: .init(
		partitionKey: ("gameId", .string)
	),
	streaming: .enabled(viewType: .newAndOldImages)
)
Permissions are automatically created and managed for you when you link two resources together via methods on the resources themselves, like this:
 pollerCron.invoke(sportsApiScheduler)
 sportsApiScheduler.link(sportsApiPollerQueue)
 sportsApiPollerQueue.subscribe(sportsApiPoller)
 scoresTable.subscribe(scoreProcessor)
You can also create custom permissions yourself via the Link struct provided by Swift Cloud, which takes in a standard array of IAM permissions and resources to give extra access where needed.
More details on all of those in Project.swift in the GitHub repo.
Targets
Each Lambda function I have gets its own .executableTarget in Package.swift, an associated folder inside Sources, and an executable Swift file within that folder called main.swift. You provide the dependencies those functions need inside Package.swift, then import them inside the Swift file itself.
Note: the executable Swift file must be called main.swift so it can execute top-level calls like try await runtime.run().
For example, my ScoreProcessor Lambda function is provided as an executable target that depends on some of my code and four third-party dependencies. The executable target for it looks like this:
.executableTarget(
	name: "ScoreProcessor",
	dependencies: [
		"Models",
		"SSMUtils",
		.product(name: "AWSLambdaRuntime", package: "swift-aws-lambda-runtime"),
		.product(name: "AWSLambdaEvents", package: "swift-aws-lambda-events"),
		.product(name: "AWSSSM", package: "aws-sdk-swift"),
		.product(name: "AsyncHTTPClient", package: "async-http-client")
	]
)
The “Models” and “SSMUtils” dependencies are each code I wrote. The four others that begin with .product(name:) are third-party dependencies that must be defined in your top-level dependencies array within Package.swift.
Swift on Lambda
Enough configuration talk. Let’s look at some actual Swift code that runs on Lambda.
Each of the main.swift files have server-side Swift code we could discuss, but ScoreProcessor.swift is an especially useful file to look at as it touches a lot of key Swift on Lambda concepts including event parsing, API requests, interacting with other AWS services, and more.
At a high level, this function is triggered when new data is written to my Scores table in DynamoDB. It parses the DynamoDB event into my own GameInfo Swift struct, which I can then act on in a type-safe way.
The top level code for ScoreProcessor.swift looks like this:
let runtime = LambdaRuntime { (event: DynamoDBEvent, context: LambdaContext) async throws -> Bool in
	context.logger.info("Received DynamoDB event: (event)")

	for event in event.records {
		guard let gameInfo: GameInfo = parseDynamoEventIntoGameItem(event: event, context: context) else { continue }

		if isFootballGame(game: gameInfo.currentGame) {
			if myTeamScored(gameInfo) {
				try await flashLightsAppropriateColors(gameInfo: gameInfo, context: context)
			}
		}

		if myTeamWon(gameInfo) {
			try await flashLightsAppropriateColors(gameInfo: gameInfo, context: context)
		}
	}

	return true
}

try await runtime.run()
Let’s talk about the five key interactions that happen within that abstracted code:
- Using the Swift AWS Lambda runtime
- Event parsing
- API PUT requests
- Swift Concurrency
- Interacting with other AWS services
First, using the Swift AWS Lambda Runtime.
The Swift AWS Lambda Runtime is defined as “an implementation of the AWS Lambda Runtime API and uses an embedded asynchronous HTTP Client based on SwiftNIO that is fine-tuned for performance in the AWS Runtime context.” More on that asynchronous HTTP Client in a bit.
The runtime runs a Lambda function’s handler method when the function is invoked. It starts with let runtime = LambdaRuntime { }, and all of your code is included in those brackets. This is how you configure reacting to certain Lambda events and access information from Lambda’s context object like the function ARN, the log group it will write logs to, the function’s memory limit, and more.
Lambda executes your code inside its run loop when you call try await runtime.run(). Reminder: you can see all of this with more context in the code block above.
Now that we have code Lambda can execute, let’s discuss event parsing.
This happens within the parseDynamoEventIntoGameItem() function.
We can use Swift’s guard case pattern matching to safely extract values from the DynamoDB records (newImage and oldImage) like this:
guard case .string(let gameId) = newImage["gameId"],
	  case .string(let sport) = newImage["sport"],
	  case .string(let myTeam) = newImage["myTeam"],
	  case .number(let myTeamScore) = newImage["myTeamScore"],
	  case .number(let previousMyTeamScore) = oldImage["myTeamScore"],
	  case .string(let opposingTeam) = newImage["opposingTeam"],
	  case .number(let opposingTeamScore) = newImage["opposingTeamScore"],
	  case .string(let previousGamePeriod) = oldImage["gamePeriod"],
	  case .string(let gamePeriod) = newImage["gamePeriod"] else {
	context.logger.error("Missing or invalid attributes in DynamoDB record")
	return nil
}
Swift’s pattern matching here makes event parsing pretty straightforward.
Numbers are sent across the network to/from DynamoDB as strings, so we still have to convert the number values to Int via Int(myTeamScore), but once you have those it’s easy to take the values and store them in your own Swift struct or similar - which is what I do with my GameItem and GameInfo structs.
Next, API PUT requests.
Once I have my GameItem and GameInfo structs, I know whether my team scored, if the game is over, and whether my team won. Given that information, I need to make my Philips Hue light bulbs flash different colors. To do that from a cloud environment, you need to use Philips Hue’s Remote API, which is a somewhat involved process that is not well documented. I found this guide very helpful. I left a comment on it fixing one bit which was outdated.
For iOS apps, we’d reach for URLSession to make our API requests. But because URLSession relies on Apple platforms, and Lambda runs a variant of Linux, we have to use something else to make our API requests. The preferred mechanism is async-http-client from swift-server. It’s built on top of SwiftNIO, Apple’s asynchronous network application framework.
To make a PUT request with async-http-client, you need to create the request with the HTTPClientRequest struct, define the HTTP method, add any necessary headers, add the request body, and execute the request with await HTTPClient.shared.execute(request).
In my project, that looks like this:
let hueBody = buildHueBody(for: color)
let url = "https://api.meethue.com/bridge/(hueUsername)/lights/(lightNumber)/state"

var request = HTTPClientRequest(url: url)
request.method = .PUT
request.headers.add(name: "Content-Type", value: "application/json; charset=utf-8")
request.headers.add(name: "Authorization", value: "Bearer (hueAccessToken)")

do {
	let jsonData = try JSONSerialization.data(withJSONObject: hueBody)
	var buffer = ByteBuffer()
	buffer.writeBytes(jsonData)
	request.body = .bytes(buffer)

	let response = try await HTTPClient.shared.execute(request, timeout: .seconds(30))
} catch {
	context.logger.error("Error updating light (lightNumber): (error)")
}
When adding the request body, you’ll notice that I created something called a ByteBuffer. That’s a struct from SwiftNIO defined as something that “stores contiguously allocated raw bytes. It is a random and sequential accessible sequence of zero or more bytes (octets)“. Whew. Let’s break that down briefly.
The jsonData we serialize our hueBody into is of type Data, which is raw binary data. We need to write that binary data to a buffer before we can attach it to our request body. That’s what ByteBuffer does for us here. It takes our binary data and writes it to a buffer which we can then use as the request body and send over the network.
Hue’s API unfortunately only allows for controlling one light at a time, and this is where Swift Concurrency comes in. Using TaskGroup or async let, we can easily and safely fire off multiple API requests in parallel (one for each light we need to control) and wait for them all to complete before returning from our Lambda.
While the async let syntax is simpler for sure, I used TaskGroup for this. I find TaskGroup’s behavior more predictable. That’s just personal preference.
Finally, the eagle-eyed among you may have noticed there was a hueUsername and a hueAccessToken used in the API request code above. Those are parameters stored securely within AWS’s Parameter Store. What does it look like to get those out of the Parameter Store at runtime? This is a good example of interacting with other AWS services.
To get my Hue API access token out of the param store, I wrote a utility function called getSSMParameterValue.
That function depends on the AWSSSM library from aws-sdk-swift and gets the parameter specified like this:
func getSSMParameterValue(parameterName: String, context: LambdaContext) async throws -> String? {
	let config = try await SSMClient.SSMClientConfiguration(region: "us-east-1")
	let ssmClient = SSMClient(config: config)
	let input = GetParameterInput(name: parameterName)

	do {
		let response = try await ssmClient.getParameter(input: input)
		guard let parameterValue = response.parameter?.value else {
			context.logger.error("Parameter value for (input.name ?? "nil") is nil")
			return nil
		}

		context.logger.info("Retrieved parameter value: (parameterValue)")
		return parameterValue
	} catch {
		context.logger.error("Error fetching parameter (parameterName): (error)")
		return nil
	}
}
I can then call that function for the parameter I need as follows: let hueAccessToken = try await getSSMParameterValue(parameterName: "hue-access-token", context: context)
Once I have my Hue access token and Hue Remote API username, I can interact with the Hue Remote API however I’d like and have it control my lights here at home.
Code Wrap-up
At this point, we’ve covered most of the core concepts you need to wrap your head around how this project works and why it’s set up the way it is. It works well, the code is pretty straightforward, it deploys to and can be removed from AWS with a single command, and it’s easy to maintain. Let’s move on from the nitty-gritty and into some different areas. Specifically cost and performance.
Cost
I’ve had this system running 24/7 since the end of January. Every ten seconds, it polls two different APIs to check score updates for my favorite teams. If it finds scores for my teams, it writes those scores to DynamoDB, which triggers my ScoreProcessor function to flash my lights accordingly.
The core system requires an EventBridge cron job that schedules SQS messages, an SQS queue that triggers my poller function every 10 seconds, a DynamoDB table to hold the scores the poller function retrieves, and a processor function that runs if scores change.
All of that code and the infrastructure running it costs less than 20 cents per month to run on AWS. Essentially all of the cost is from DynamoDB, which I could be smarter about to save money if I cared about 20 cents per month.
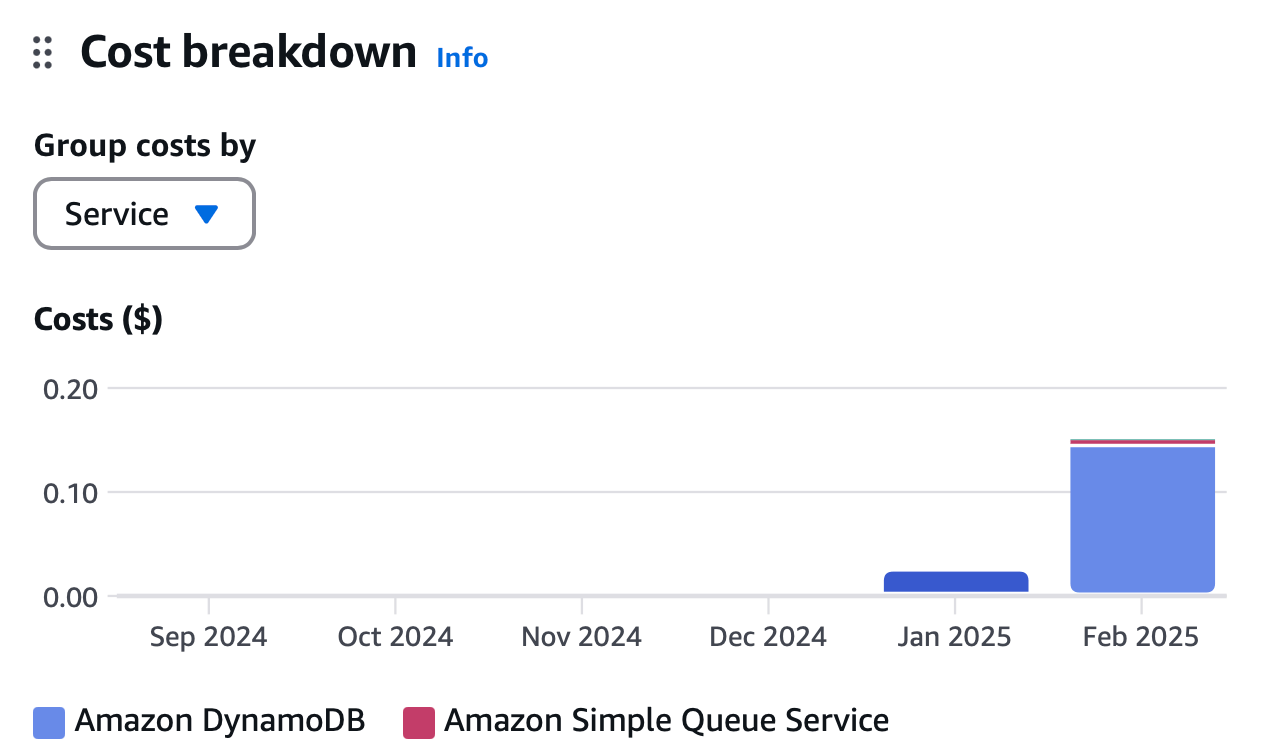
Further, because this is fully serverless, it will scale to zero for a large chunk of the year. The first step of my job scheduler function is to check whether it’s currently football or basketball season, and, if it’s not, return immediately and don’t trigger the rest of the flow. At that point, the system will automatically scale down to $0/month without me doing anything whatsoever.
The beauty of serverless!
Performance
To evaluate performance, let’s look at both my API poller function which runs every 10 seconds, and my score processor which is triggered much less often - it only runs if there is a change to one of my favorite teams’ scores. Both of these functions call other APIs, so their total run time is dependent on the response times of those APIs as well.
I don’t have any broader monitoring set up for this project, but CloudWatch does provide cold start times via the “Report” section of each invocation. We’ll default to looking at the three most recent log streams for each function and average out both the total durations and cold start times of each.
Each log stream contains one cold start (its first invocation), and then each subsequent invocation inside the stream is from an already-warm container - so there are no cold starts after the first invocation in every log stream. Therefore, we’ll look at the duration and cold starts of just the first invocation of each log stream, which theoretically should have the worst performance of any of the invocations in the stream.
API poller function:
- Duration 649.85 ms, cold start 194.40 ms
- Duration 713.07 ms, cold start 197.26 ms
- Duration 766.10 ms, cold start 204.21 ms
Average run duration: 709.67 ms
Average cold start time: 198.62 ms
Most of the run duration here is waiting to hear back from the ncaa-api and the public-espn-api. The processing time once we get that data is negligible.
And look at the sub-200 ms cold start time! This is in a Lambda function that imports five large third-party dependencies, Apple’s Foundation library, and two of my own dependencies. The unzipped executable it produces is 143.7 MB. Hitting under 200 ms to warm up a code package that large is noteworthy.
Score processor function:
- Duration 14496.34 ms (lights were triggered), cold start 192.10 ms
- Duration 28.98 ms (no light trigger), cold start 204.72 ms
- Duration 36.15 ms (no light trigger), cold start 208.71 ms
Average run duration: 4853.82 ms
Average cold start time: 201.84 ms
The average run duration here is massively skewed by the first invocation, which triggered the flow that makes my lights go crazy. When that happens, my lights change colors 13 times with half-second delays after each change. Because Hue only supports changing one light per API request I have to make 4 API requests in parallel for each of those 13 color change requests so it can change all four of the lamps in the room I care about. Waiting for all of that to complete is what causes the long run time.
There’s a similar story on the cold start times here. Just above 200 ms on average for an unzipped executable that comes in at 154.5 MB due to five more large third-party dependencies, Apple’s Foundation library, and some more of my code.
Let me reiterate that those cold starts hardly ever come into play. Most invocations don’t have any cold start period, as Lambda reuses already-warmed containers very often. The speeds reported here are the worst-case speeds when a fresh Lambda container needs to be spun up, the code loaded into memory, etc.
Given that I haven’t done any work at all to try and slim things down, I’m quite happy with 200 ms cold starts in these cases. This is just from the raw code I’m deploying to Lambda from Swift Cloud with no real consideration for optimization or efficiency. Not bad.
Source Code
And that about covers it! The full repository, including everything discussed in this post and much more, is on GitHub.
Here’s the raw URL: https://github.com/r-token/sports-home-automation-swift
If you’ve gotten something out of this post, please give the repo a star!
Shout-Out to Andrew from Swift Cloud
I want to take a moment and give a huge shout-out to Andrew Barba. He created and maintains Swift Cloud, and provided a ton of help in the Swift Cloud Slack while I was working on this project.
It’s a fantastic tool, and Andrew was quick to respond to feedback and gave help when I needed it. If you’re interested in running Swift on AWS, I’d start with Swift Cloud.
Thank You
If you made it this far, thank you for reading! I know it was a long one.
I had such a blast creating this project and writing this post. It combines two of my favorite things: serverless back-end systems and the Swift programming language.
I love talking about this stuff. If you want to chat, feel free to reach out over email, Bluesky, Mastodon, X, or LinkedIn.
And if you particularly enjoyed this post, you can buy me a coffee!